2022-08-11
Viewing Mastcam-Z Images from the NASA Archive
by Sydney Larriva (ASU Mastcam-Z Student Researcher)
Do You Want an Easy Way to View Mastcam-Z PDS Images? – A User’s Guide to the PDS4 Viewer Tool
Do you need help viewing Mastcam-Z images in the NASA Planetary Data System (PDS) archive? One solution is to use NASA’s PDS4 Viewer tool! PDS4 Viewer is a visualization tool for archived data in the “PDS4” format that the Mastcam-Z team uses to archive our images for the public and scientific communities, and is available on multiple platforms with minimal installation requirements. To download and install PDS4 Viewer to your computer, follow the instructions on the PDS4 Viewer Wiki page to select and extract the zip file associated with your computer system and software. From there, you can either navigate through the PDS4 Viewer and open Mastcam-Z .xml files as an Application (recommended for general users) or you can do this through the command line, if you are comfortable doing so (recommended only for those experienced working on the Command Line Interface).
Navigating the PDS:
To open Mastcam-Z Images in PDS4 Viewer, you first need to select them from NASA’s Planetary Data System. If you are unsure of how to navigate the PDS, go check out our great blog that walks you through the step-by-steps to get to ASU’s Mastcam-Z data: Mastcam-Z Data for All! You will need to find the so-call “.xml” files associated with each image from the Data Collection in the PDS in order to have access to the full range of functions that PDS4 Viewer offers.
Navigating PDS4 Viewer as an Application:
Once the PDS4 Viewer zip file is downloaded and extracted, follow the PDS4 Viewer Wiki directions under Installation for your system to open the application. A small GUI window should appear (see Figure 1). Once you have a specific .xml file in mind, copy the .xml’s URL straight from the PDS website. (Check out our Navigating the PDS section above to understand how to find .xml files on the PDS) Then, use the “Open from URL” option in the File menu bar and paste the URL to open it! (see Figure 2)

Navigating PDS4 Viewer through the Terminal:
Once the zip file is downloaded and extracted, you may call PDS4 Viewer to open the GUI start page by typing the file path to the application. For example, on a Mac where we left the application in Downloads, the path might look like: Downloads/PDS4_viewer_mac10_13-1.3/pds4_viewer.app/Contents/MacOS/pds4_viewer
To open a file straight from the PDS website, type the file path to the pds4_viewer application (example file path shown above) followed by a space and then the .xml file’s URL. Both ways require using NASA’s PDS to copy its URL. (Check out our Navigating the PDS section above to understand how to find .xml files on the PDS) Whichever way you choose, your .xml file should open up to an initial GUI page.
Data Structure Summary:
The GUI page that appears is the Data Structure Summary (see Figure 3), which includes basic information about the selected image as well as a View subsection that normally includes three options: Label, Table, and Image. (Some files, such as XML labels for .mp4 and browse product types may only have the Label option under View.) The summary page also has many helpful features in the menu bar above, such as the various Open options under File and the Show Headers option under View that reveals additional header information, such as the ODL3 and Vicar headers.

Label:
To get information about the selected image, click on the Label option under View (see Figure 4). A second GUI window will pop up, showing the default object label with limited information.
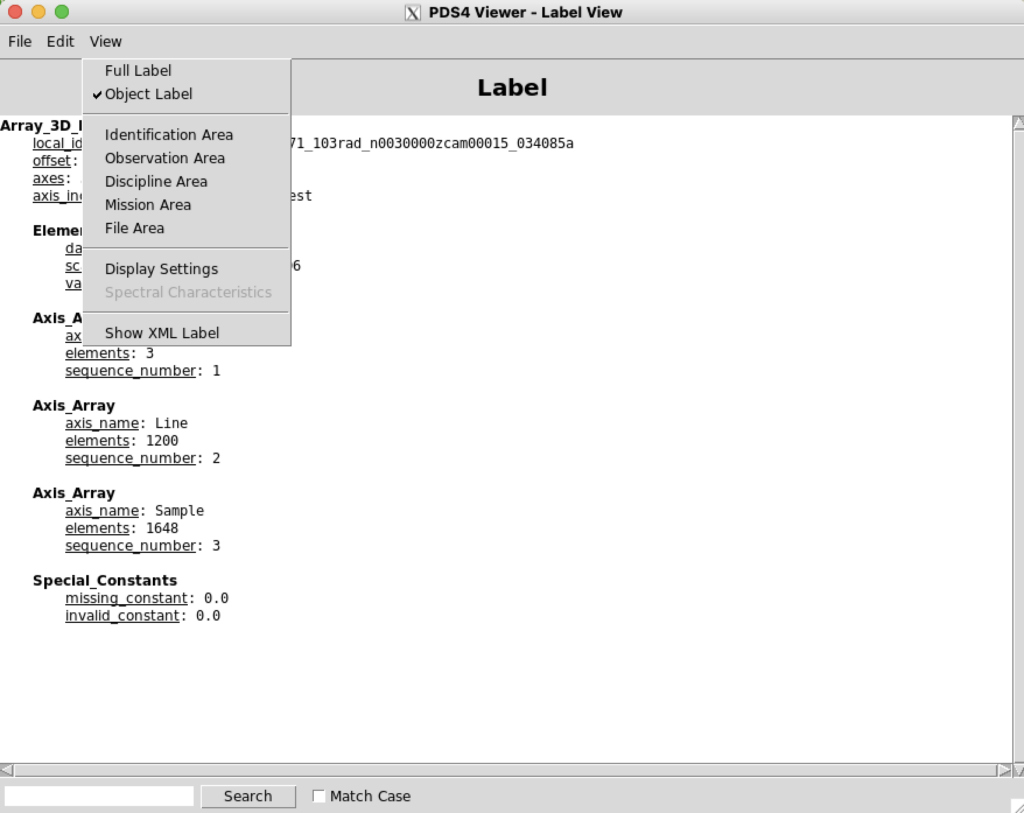
To see the full label, click “Full Label” under the View menu bar (see Figure 5). The full label is organized with 5 main sub-headers: Identification, Observation, Discipline, Mission, and File Area, each of which can be selected under the View menu bar to show only information from there. Another helpful tool found in Label is the search bar at the bottom left of the window, which shows all results that match your search, with the option to ignore case. The resources in Label provide you with a more readable format than the default .xml labels that you might have seen, when selecting an image to explore, as well as the ability to easily search through the Label to find what you need.
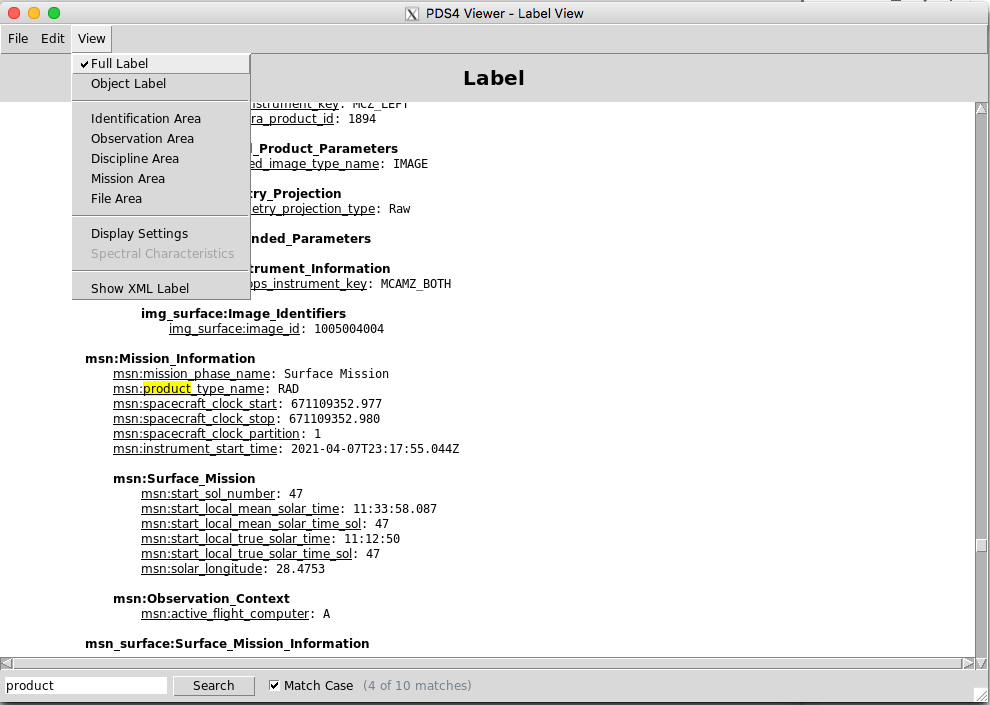
Table:
Do you want to know information about each pixel of the image? In order to see the values of each pixel in the image, you can click on the “Table” option under View. Clicking “Table” will open up a separate GUI window displaying each pixel value in the position it is in the image (see Figure 6). If it is a single-band image, there will be only one table, whereas multi-band (RGB color) images will have one for each band. For example, a multi-band image that is made up of RGB filters will have 3 tables. One for each of the 3 bands that are overlaid to create the picture you see. An important note to keep in mind is that the top leftmost pixel is row 0, column 0 in the table, not (1,1)! The values in the table represent the returned value of each pixel in the filter selected. All of our Mastcam-Z filters, with the exception of Filter 0, have a specified range of wavelengths that they are sensitive to and capture (for more details, see our blog “The Mastcam-Z Filter Set: How Perseverance Will See the Colors of Mars”). Want more general information about what pixel values are? Check out this page created by HIPR! Are you science-oriented and want to get into the nitty-gritty of why Mastcam-Z images return the pixel values they do? Check out the Mastcam-Z Pre-Flight Calibration Paper, specifically information about Spectral Throughput and the examples from pre-launch imaging of our “Geoboard”.
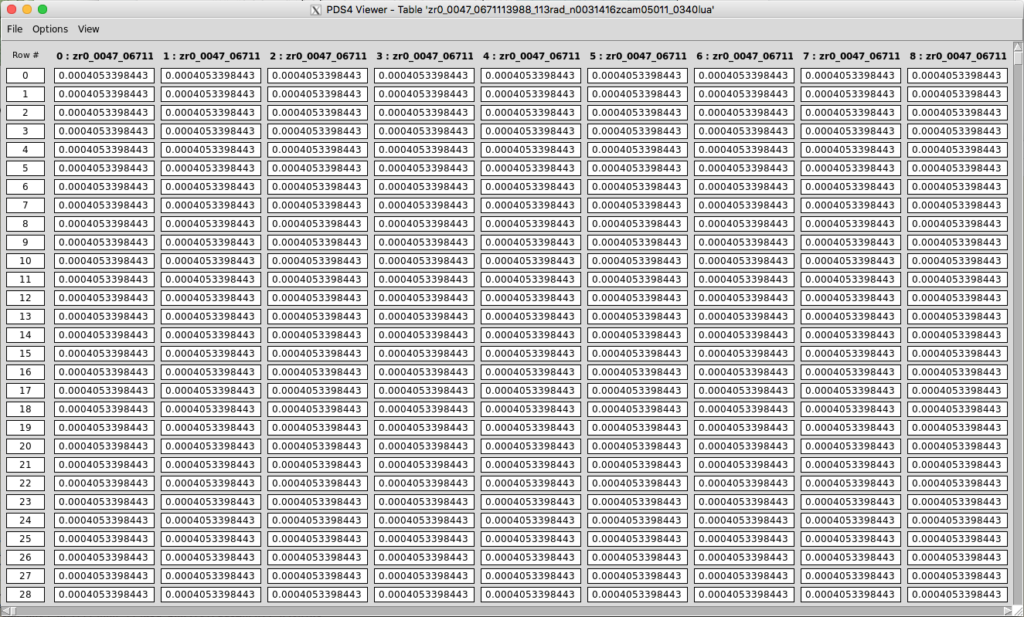
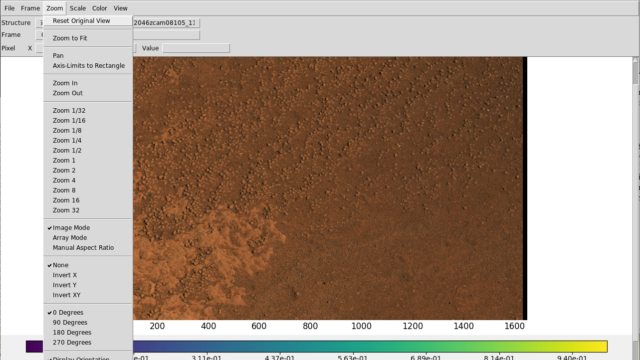
Image:
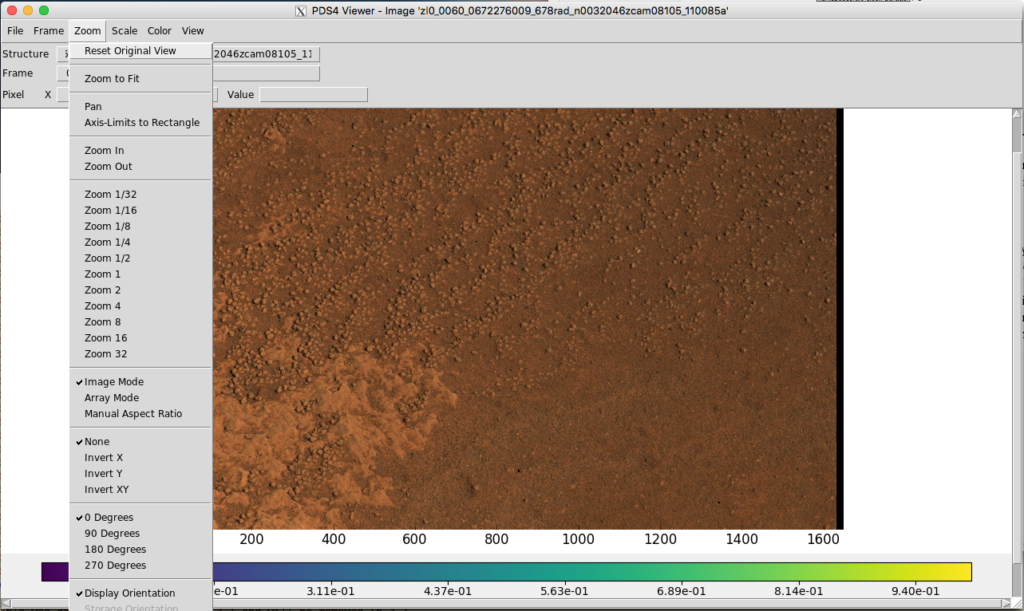
Do you want to see the image you chose and even alter it to your liking for personal use and downloading? The final, and most broad feature from the Summary page is the “Image” option under View. After selecting it, another GUI window should appear with your image and several menu bar options including: Frame, Zoom, Scale, Color, and View (see Figure 7). Frame is limited to only specific data products, and is not applicable for looking at Mastcam-Z data, so we can largely pass over it in our exploration. The Zoom menu bar allows you to adjust the size, to invert, or rotate your product. Scale offers several options to alter the scale parameters of each pixel value, allowing you to enhance the image in various ways. You can also change the colors of the image in the Color menu bar, as well as invert the colormap and display a colorbar below or to the right of the selected image. (Take note, certain images cannot have RGB selected as a color option due to the nature of the product.) In addition, if you want to display gridlines to show the size of the image, select ticks under the View menu bar. Happy with the alterations you have made to your chosen image and want to save it to your computer? Click the File menu bar and “Save Image” to the location you desire for your device.
If you need any further information about the tool, the official Wiki page for the PDS4 Viewer has additional screenshots of the pages described above. You can use it in addition to this User’s Guide when accessing Mastcam-Z data to help navigate the system. Enjoy exploring Mastcam-Z in the PDS!
P.S.: Want to explore more PDS4 tool options? Check out our other blogs on the Mastcam-Z website or explore NASA’s PDS Tool Registry to see how you might expand your Mastcam-Z horizons!